Search and Find
Facebook Advertising: Tell the World about Your Programs
Facebook advertising is the most effective and inexpensive ways to advertise your events. Unfortunately, it is also one of the most complicated. Plan to spend one hour creating your first ad.
In this example, we are going to create an ad for an event so people react to the event (Campaign Objective). We will try to reach people 18-26 years old near Colombo who are interested in Buddhism and meditation (Audience). We will run the ad for two days and spend $10 (Schedule and Budget).
#1. Log in to Ads Manager. (https://www.facebook.com/adsmanager) Make sure you have the correct account selected in the top left corner. Then click Create.
If you have never created an ad before, you will have to set up your account…


#2. Then you should see this screen when you create the campaign. In this example we have the goal (objective) of engagement with an event. So click Engagement.

#3. If you don’t see the screen above, look for the Switch to Guided Creation.

#4. Scroll down. For this ad we want to get people to say that they are interested in an event. So select Event responses. Next give the campaign a name. It should be very specific. In this example, it is an ad for Colombo Dhamma Friends for the June Poya program. Then click Continue.

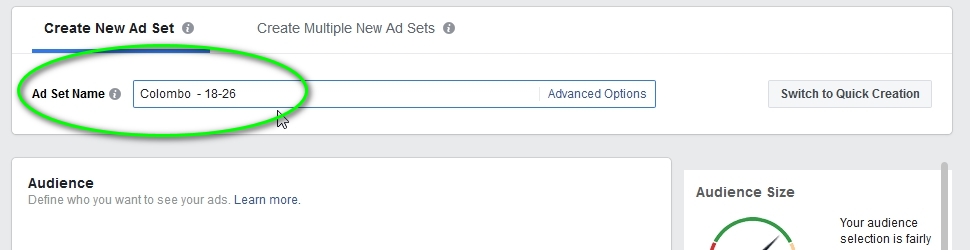
#5. Now we are creatign the Ad Set. Here we will decide who to show the ad to (Audience), when we want to show it (Schedule), and how much we want to spend (Budget). Start by giving it a name. This ad set is for youth, so we include the ages 18-26.
#6. If you are going to use a Saved Audience, use these instructions and when you are done, skip to step #18. Now we will choose the location of the audience. At first it is set to all of Sri Lanka. You can see in the highlighted box the potential number of people we could reach in Sri Lanka is 5,300,000. But we just want to show the add to people near Colombo.

#7. Type in Colombo and select it from the list.

#8. You can see that it automatically includes Colombo +25 miles. And you can see now the potential reach is 2,900,000.

#9. When you type in a city name, if you want to include beyond the city, the least it will let you go is 10 miles. You can see that when reduced to +10 miles, the potential reach is 2,500,000.
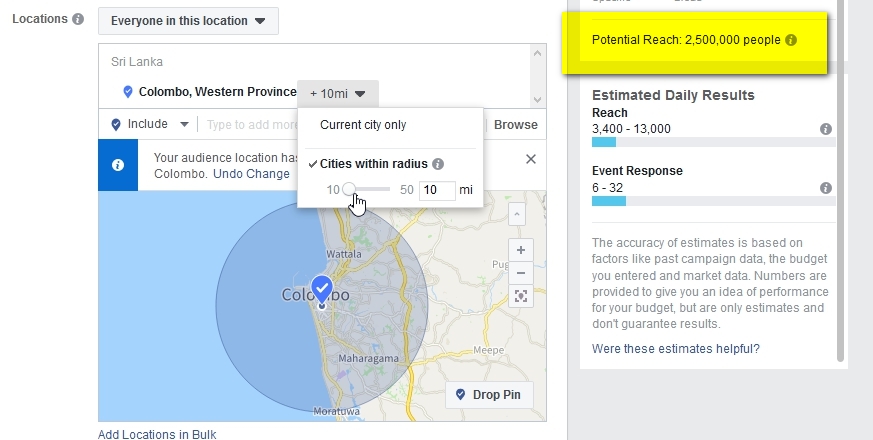
#10. Next we can select the age. In this case we are trying to reach young people, so we will set it to 18-26.

#11. Now you see that the potential reach is down to 1,000,000.

#12. Next we will set detailed targeting. We will use meditation. Type into this field and select meditation listed as an interest.
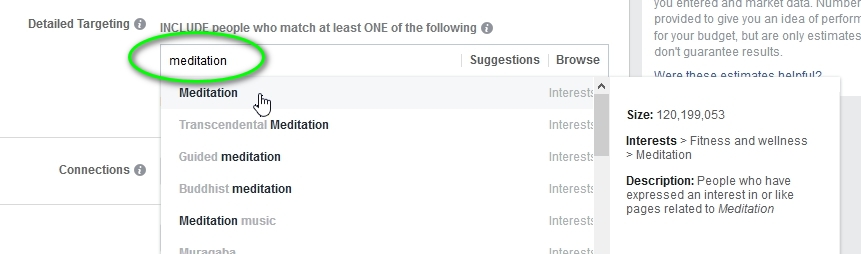
#13. Now the potential reach is down to 50,000. This is getting closer to a good number. Remember, the ACTUAL number of people who see the ad depends on how much money you want to spend. So we want to target the people who are MOST interested in what we are offering.

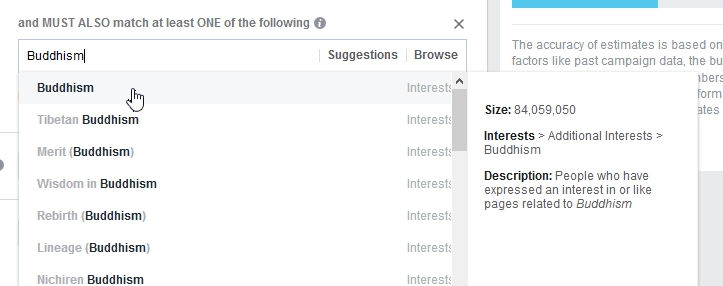
#14. Next we are going to narrow the audience (make it smaller) with the requirement that they also be interested in Buddhism. If we add Buddhism in the field above where we put meditation, the requirement would be “meditation OR Buddhism” But we want “meditation AND Buddhism” So select Narrow Audience.

#15. And type and select Buddhism.
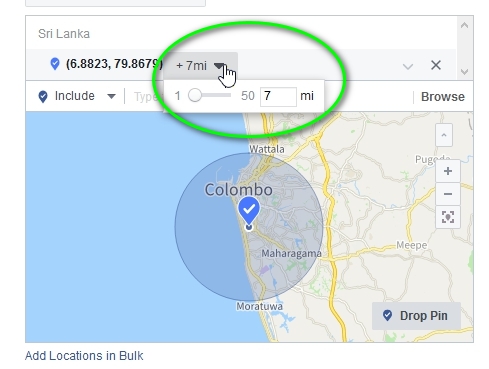
#16. If you want to narrow the area even more, you can click Drop Pin and choose a point on the map. The Drop Pin method lets you shrink the area down to 1 mile radius.
#17-A. The city method still had our number too high, so now we have set a pin.

#17-B. If you would like to use this audience again you should save it by clicking Save This Audience. Give it a name that describes the audience like “Parents of children 8-18”

#18. Now you can see in our example that the Potential reach is down to 30,000. This is still a little big, but it’s ok. Next we will decide how much mone we want to spend. This is our Budget. Best thing is to set a Lifetime Budget. We will start by spending $10. Select Lifetime Budget.

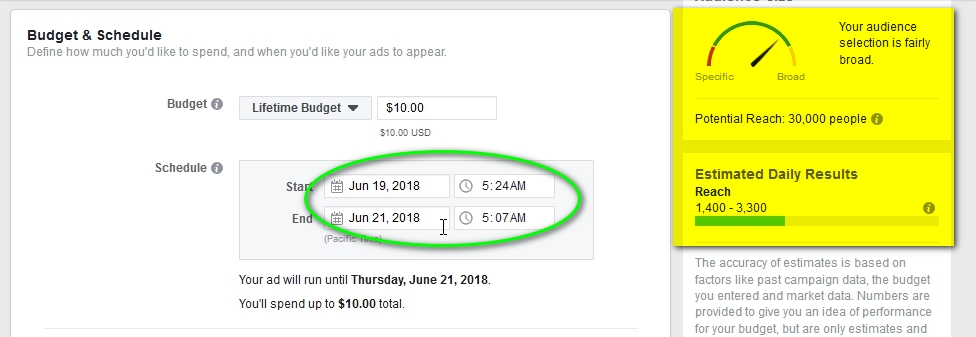
#19. At this point you may get an error message saying that $10 is too low. PAY ATTENTION! This is because of the next factor, the schedule. You can see that the End of the schedule is set for one month after the start, July 19.

#20. Change the end date to be two days after the start and the error will go away. Now in the highlighted box below you can see that the Potential Reach is still 30,000, but now the Estimated Daily Result is 1,400-3,300 people. These are the people that would actually get to see the ad. That is a good number.
#21. In the next section you can keep all the settings as they are. Click Continue.

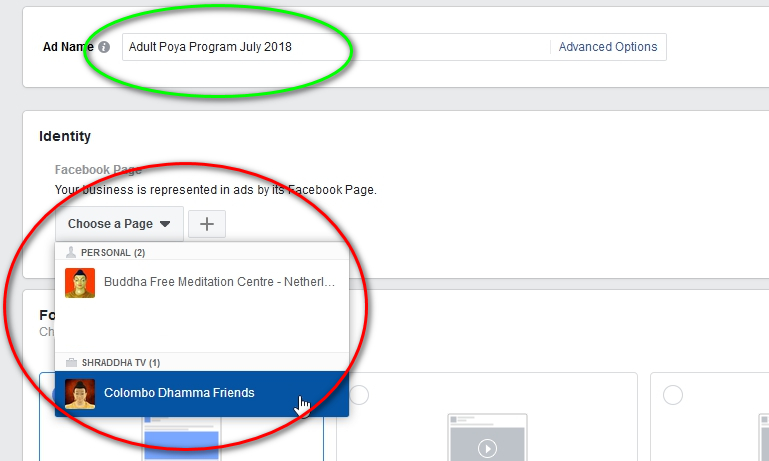
#22. Now we are in the third and final step of the process: creating what the ad will look like. The name of this ad shows the date as well as who it is targeting for which program. After you type the ad name, you need to select the Facebook page that will run the ad.
#23. Because we are going to use an existing event, we can skip the next section.

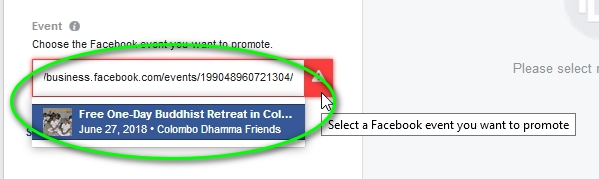
#24. Here is a tricky bit. Click in the box labeled Event.

#25. Hopefully you will see your event listed. Pay VERY CLOSE ATTENTION to pick the right one.

#26. If your event did not appear, you will need to put in the url of the event. By clicking on the (i) icon you can get instructions.

#27. If your event did not appear, you will need to open a new tab and go to your event. Copy the url. It should look like the example below with /events/ and a long number.

#28 Paste that url in the box. If it works, the event should appear. If it doesn’t work, be sure that you actually have an event that is live. Also be sure there is a ticket link in the event page.
#29. Now scroll down and you may see some text from your event is already entered. In the example below, it only added the first line of the text. On the LEFT is where you can edit and on the RIGHT is where you see the final ad.

#30. Go back to your event, open the editor, copy all of the description, and paste it in the textbox,

#31. Make sure the links in the text are complete. if you see a … in the link ON THE LEFT SIDE it means it is broken. When you are happy, click Confirm. This will tell Facebook to start the ad. Because this is spending money, a lay person should do this last step.

#32. You will see a message while it saves.

If you have never created an ad before and have no payment method entered, you will be prompted to enter a credit card number.
#33. Then it will take you back to the Manager. You will see your ad in the list and it will probably say “In Review”. It can take 1-24 hours for an ad to be approved.

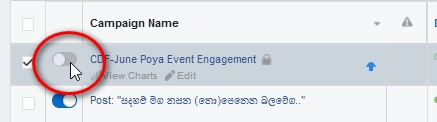
#34. Look carefully and you will see that only the new ad has a check on the far left. See how there are three tabs: Campagns, Ad Sets, and Ads. Your ad has all three parts.

#35. If you want to stop an ad temporarily, just click the blue switch button next to the check box.
#36. If you click on the Ad Sets tab you can see the set. This is the place where you selected Audience (in this example by location, interest, and age), Budget, and Schedule.

#37. And the third tabe is where the actual ad that people will see is shown.

#38. That’s it! now you have to wait for reactions.
Be sure to when people like the event to invite them to like the page.
These are extra instrucions if you are doing other things with your setup
Using a Saved Audience
If you have saved an audience and want to use it again, you will skip steps 6-17. Instead, look for where it says Use a Saved Audience. If you hover over the audiences, it will show you the details. Choose the one you want and Facebook automatically fills in the information in steps 6-17. You can review what is now filled in and make any changes. Changes you make WILL NOT change the saved audience. You will have to re-save the audience if you want the changes to be saved. Now go back and start at step #18 (click here to go to step 18)
